Project - Pressure Strips For Master Bedroom via MQTT & Node-RED

So, I needed to find a better solution to move away from my Qi chargers for night and quiet and take a step into the unknown.
I found this tutorial and and decided to dive in. I am posting my write up here because that one was quite advanced and I think think it might scare off the new users. This is a project that Markus and I did in an interim we found over the weekend.
GitHub - eoncire/HA_bed_presence: HomeAssitant / ESPHome / NodeRed bed presence and automations

After I read this, I was like YES! That!

I didn’t have components lying around, so I had to start from scratch.
If you’re ordering up your ESP32 make sure it works with Tasmota. This project is Tasmota driven.
Here is a list of what I bought:

Amazon.com: InstallGear 14 Gauge AWG 30ft Speaker Wire True Spec and Soft Touch Cable - Red/Black: Industrial & Scientific

Amazon.com: Xiaoyztan 2 Pin 5mm Pitch PCB Mount Screw Terminal Block Connectors, Pack of 50 Pcs: Car Electronics

Amazon.com: REXQualis Electronics Basic Kit w/Power Supply Module, Breadboard, Jumper Wire, LED,Resistor, comes with more than 300pcs sensors and components for fun and simple electronic projects.: Computers & Accessories

Thin Film Pressure Sensor Flex/Bend Sensor SF15-600 10kg Resistance-type Force Sensing Resistor FSR Sensor Force Sensitive Resistor: Amazon.com: Appliances

Amazon.com: ESP-WROOM-32 ESP32 ESP-32S Development Board 2.4GHz Dual-Mode WiFi + Bluetooth Dual Cores Microcontroller Processor Integrated with Antenna RF AMP Filter AP STA Compatible with Arduino IDE (1 PCS): Computers & Accessories

The kit I ordered contained a breadboard, which you’ll need. 5k Ohm Resistors. Markus used 4k7. And solid jumpers.
I ordered stranded wire, and I regretted it because I had to tin the ends with solder when I wanted to cut to length. My soldering skills need work, be we won’t talk about that
:grin:
So, let’s get a bit more granular than the github walkthrough. I want to note that Markus helped me with this. I wouldn’t have been able to make heads or tails from this.

With your breadboard in front of you do the resistors first. We laid ours out differently as seen below.

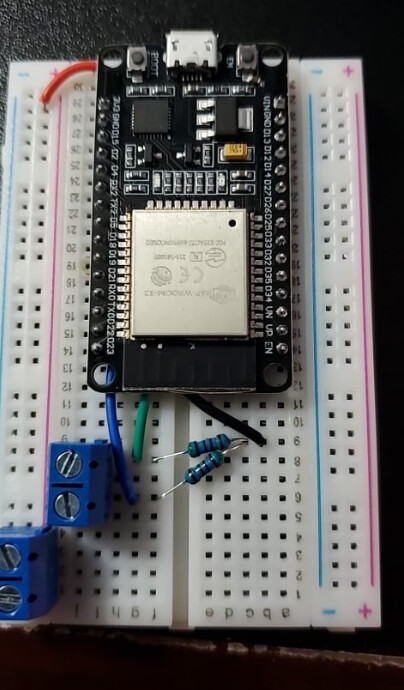
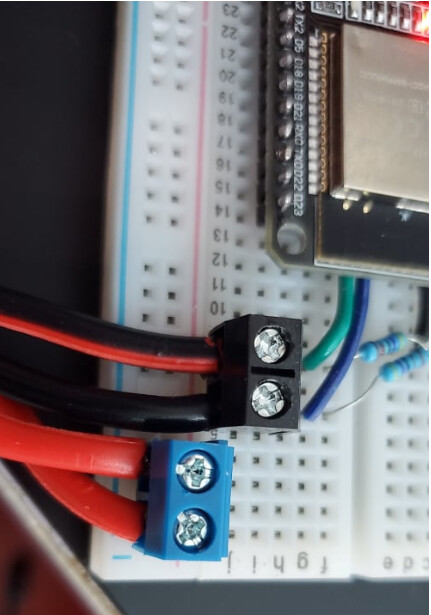
I placed the resistors spanning F6 to C9 And F8 to C9 (They can be together,… I’m told.) Notice the pin holes on the tops of the terminal block connectors. They need to line up with the resistor.
The block connectors are staggered. One is in the + 1&3 and the other is in J6&8.
(The wire I ordered was 14 gauge and it was a bit of a chore to get them into the block connectors. Keep that in mind. Might go with a larger gage wire. I had to tip the stranded wires so that I could press them into the breadboard)

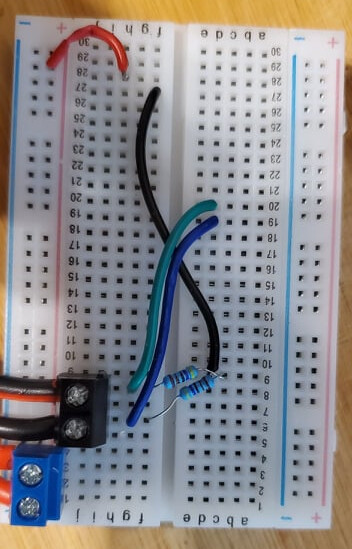
I cut one wire and tinned from B9 to F27. Run this one first. Then cut two different wires to length (had to tin the ends) and plugged one in G6 and ran that to D19 and the other From G8 to D20

Last, we used a red wire for power. That one went from the 28 in the plus to H28.

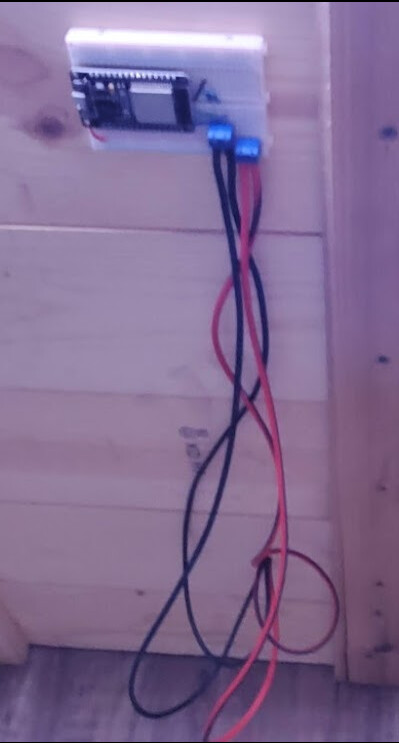
Next attach the ESP32 and make sure that the 3V3 pin is aligned with row 28. We put it in 28i so that it would protect the wires and so that the board doesn’t stick past the breadboard. Keeps things nicely buttoned up.

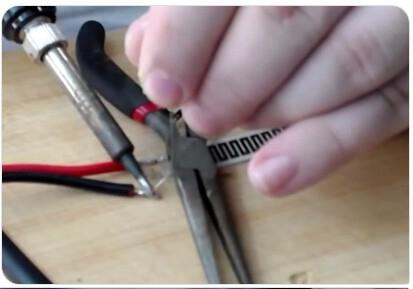
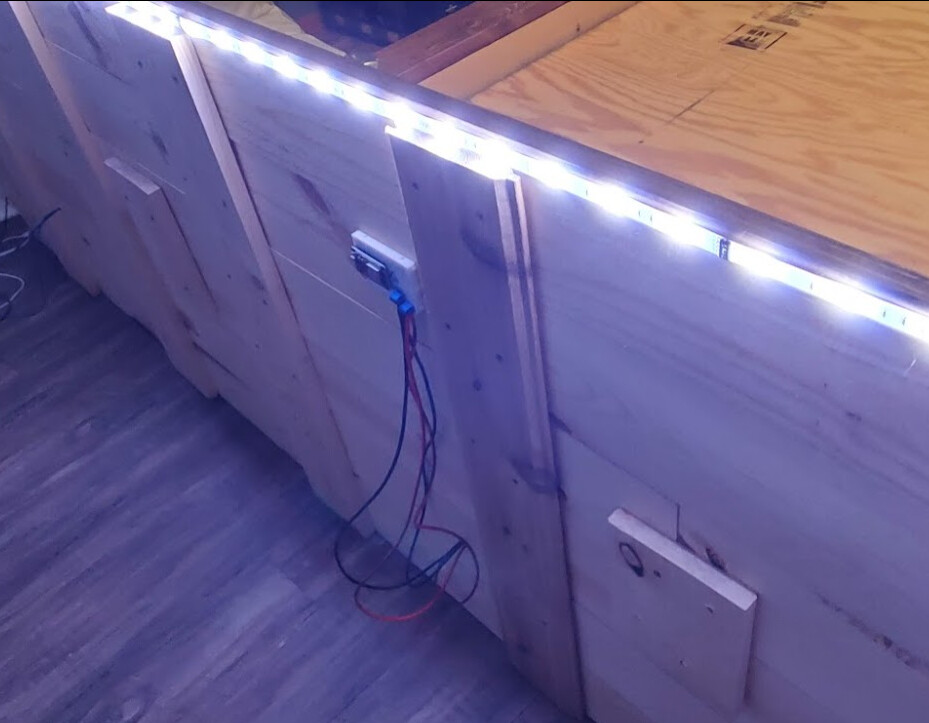
Next, Cut the wires for the strips. I cut each 5’ long. You don’t want to strain these wires. You should plan out where you’re going to mount the strips and plan accordingly. You will need a micro-b with a 1 amp power brick. The 1 amp is to make sure that things won’t overheat. Keep that in mind. Next, we’re going to solder the wire to the strip. BE CAREFUL not to overheat these. They are a bit sensitive to heat. Red on one side black to the other. Do this with both strips.
TIP: Tin the wire tip. Then press the soldering iron onto the wire that you tipped to melt the solder to the strip. This will help to prevent overheating. Don’t hold it there any longer than necessary. See photo below.

image

image
I had an afterthought and ended up adding some shrink tubing to protect the solder and strengthen the connection.

Now don’t power this up yet. Time to flash some Tasmota.

You need ESP flasher

You need this firmware:
tasmota32.bin from here: Releases · arendst/Tasmota · GitHub
We used version 9.5.0 - To flash this connect a micro-b to the ESP32. Press and hold the boot button (printed by the button)

When plugging in to the computer keep that button pressed for a few seconds
then choose the com port that it populates with after you press refresh. Choose your file and flash it.

Refer to the Tasmota documention to configure for wifi. It will boot into access point mode. You can connect to that and configure your wifi.
After you get it connected, use your browser to connect to the ESP and click
Configuration
Set MQTT
Change topic
Then put the room in full topic %prefix%/ROOM/%topic%/ (enter the room where it says ROOM. Change that)

After clicking save, go back to configuration and choose Configure Other
Change the DEVICE NAME only here. click save
Then go back to main menu
Click Consoles
Click Console

Enter these commands separately, press enter after each one

Rule1 ON analog#a1div10 DO status 10; ENDON

Rule1 1

Rule2 ON analog#a2div10 DO status 10; ENDON

Rule2 1

The command below is one line, although it appears on two here. copy the entire command.

backlog module 0; template {"NAME":"ESP32-Pressure","GPIO":[1,1,1,1,1,1,1,1,1,1,1,1,1,1,1,1,0,1,1,1,0,0,1,1,0,0,0,0,4704,4705,1,1,1,0,0,1],"FLAG":0,"BASE":1};

Next is to attach the wires to the brick Connectors. Red from both strips into the brick in the + lin 1&3 and connect the two blacks (1 from each strip) into the brick in row J. Make sure they are well secured.

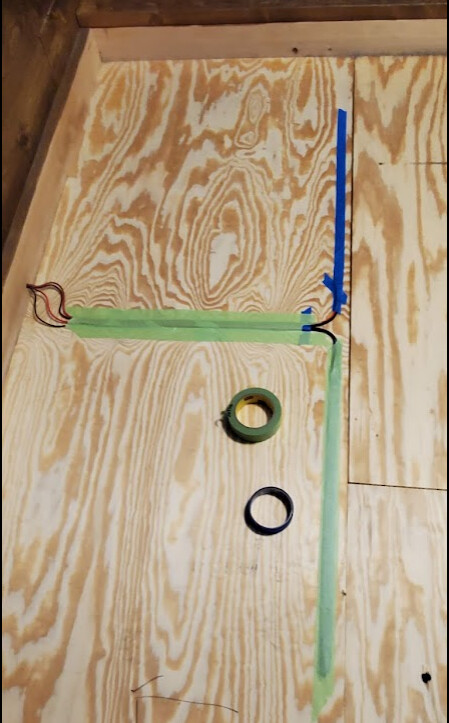
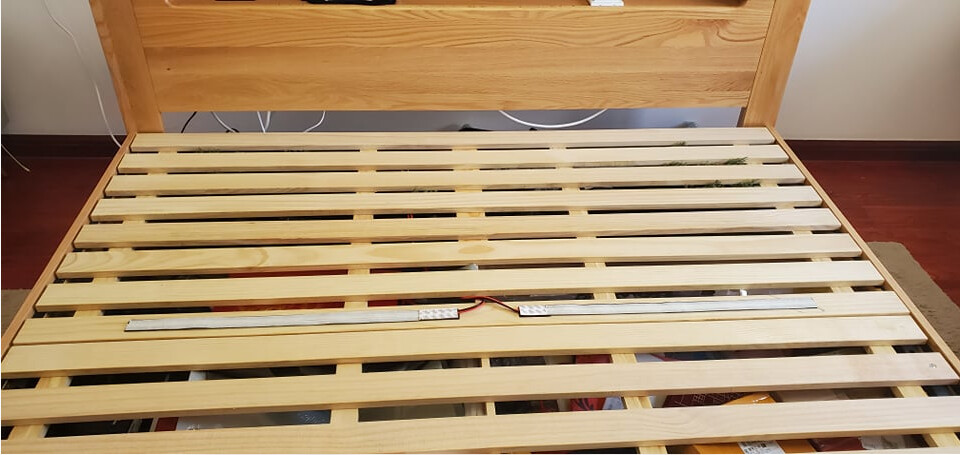
Now you’re ready to install. I used some wide painter’s tape to secure it to the bed. I had to drill a hole through the base (Platform bed) to the back where I mounted the breadboard. Connected power from there. Notice The sensors are placed in the upper 3rd of the bed.


image

Markus has a bed with storage, so his install was a bit easier (sans the Christmas tree) :grin:
He fastened his strips with velcro.

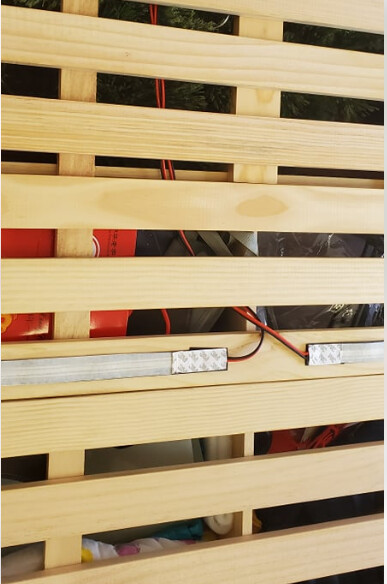
The breadboard is fastened under the boards in the storage area

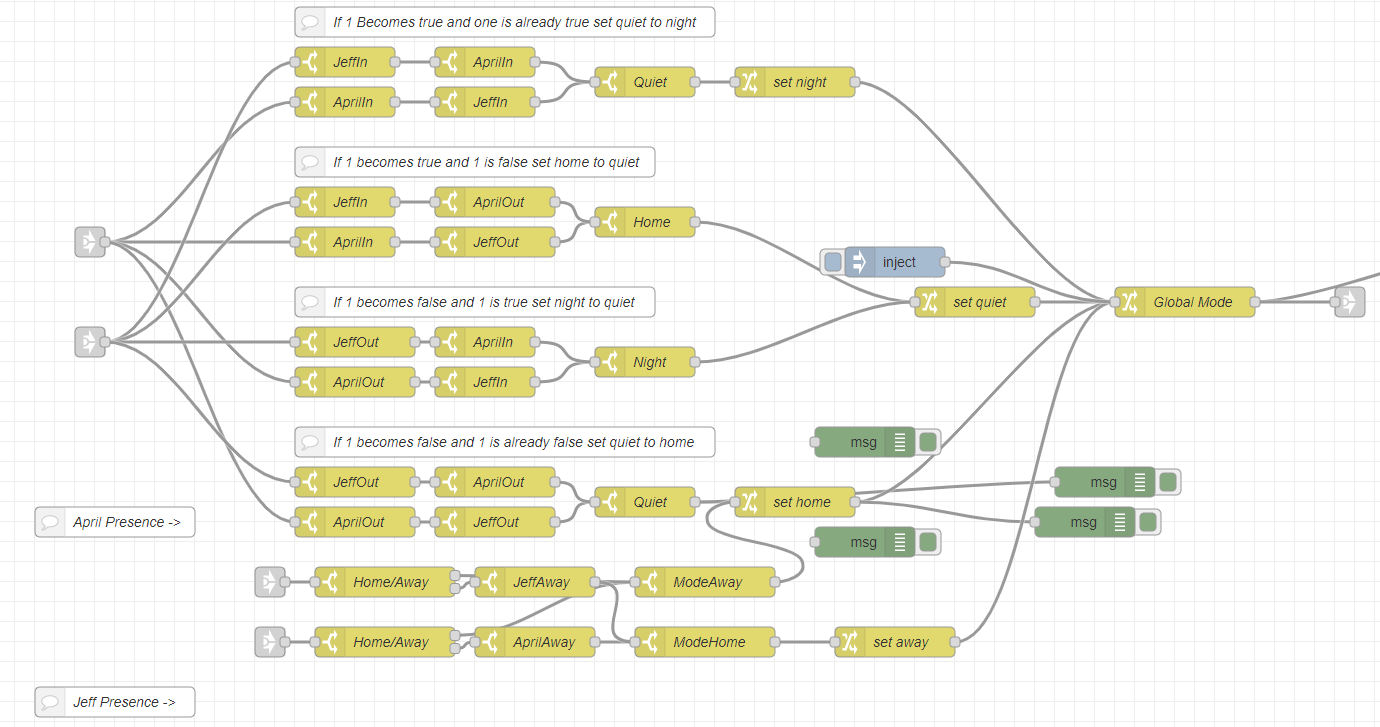
The flow was a bit more complicated for me as each use case is different. Ultimately, I ended up with a flow that works for my use. I’m happy to help with setting this up. You only need to ask.

Thank you for putting up with me on yet another tutorial. I’ll go back to my corner now and work on CORE.

8 Likes

Nice write-up, April, thanks for sharing!

1 Like

Hide this from my wife! I got enough projects right now. :rofl:

Nicely done.

2 Likes

Just a follow-up - last night, the sensors worked flawlessly. BUT I have to laugh. I have the same presence → one person in bed is quiet time. There is a lamp in the living room that turns on during quiet time and off at night mode when two are in bed. Well … we got a new mattress and it’s not settled yet. Every time I rolled over, blink. The living room lamp blinked on and then off. Woke me up every time.
:rofl:
Jeff said “This gonna happen all the time?”
:rofl:
:kiss:
I’m working on a stop timer to prevent this. Way too responsive.

4 Likes

Yeah I feel like treating them as “motion sensors”, or contact sensors for that matter, and applying logic that way with would be the way to go. That is, time without pressure, then do an action. I feel like that way you could reuse ALL of the logic from your motion flows, just with a different output and input.

Only downside obviously is you are now artificially including a delay which can hurt the overall seamless feel of the automation.

1 Like

YES! I’ve been trying to come up with something that feels natural. Before now, I had wireless Qi chargers that had contact sensors in them so when we docked our phones bedside, the mode would change. This worked well because it was natural and the last thing we did before bed was dock our phones and picked them up when we got up. This is a whole new level. I’m glad that I can reuse my contact sensors for other things, but it has posed a new problem. Way too responsive.

I think I’m going to have to re-evaluate our habits and use case so that the house knows what I want again. I take pride in silent smartness. I don’t ask she who shall not be named or poodle to perform some random act of un-holiness to get lights, fans and tv’s to do what I want them to do. I’ll need to get back to that. I’m just not quite happy with the timing of this, but it’s nice to have the sensors because we’d been having troubles of the sensors going to an opposite position when docking because we’re adjusting the phones. Then it’s back down to the computer to straighten it out. cleaning lady moving them around and getting the same result so when I get home, nothing is working right. This is pretty cut and dry. I just need to get the timing right. I’ll definitely be posting another update.

Meanwhile: Markus has the bed sensors sensing when he gets out of bed and primes up his nespresso for a fresh cup when he reaches the kitchen.

If only my mattress would settle. I’m happy we bought a new one, but frustrated it’s needed this time to settle in.

1 Like

I wonder if the best route would be to use all 4 sensors, each side’s pressure and qi, and just boolean OR them all as an input, that way the trigger on is easy, but the trigger off is not so easy. Taking a similar approach to geofencing which has a tendency to be unreliable if using a singular source.

Also in regards to Alexa, I can’t tell you how happy I am that you got me on the NR train with Alexa remote2, I have completely room agnostic commands for basically everything and from lights to fans to curtains to special routines. Now the issue is when multiple rooms hear my wake word due to the open floor plan, but that is an Amazon issue more than it is anything, and I know how difficult signal processing is, I studied it in college. Picking a singular voice out of a crowd is already extremely difficult, but measuring its distance is a whole other thing, especially from basically only a single reference point.

Oh yah, I remember. The radio project. Still running today on CORE. I think that’s great! I strongly encourage that you use what works for you. I like her, but it seems that my dog has a complex with voice assistants speaking out of turn in my house and she hides from them. I try not to antagonize her with arbitrary announcements from the inhuman voices lurking in the bureau. :grin: I haven’t bothered since that fear became evident.

I considered using both, but unlike geofencing, it’s probably not as necessary to be as accurate. Once the mattress settles into existence, then things will be more consistent. I just need to think about how I want things to react NOW with each mode. Outside the box. In quiet and night, there’s not much difference other than lights absolutely do not come on if we’re both in bed. I just need to adjust for that and hone in the flows again. I think that’s possible. But, it’s been a delightful and laugh worthy experience because I hadn’t realized how many things depend on this. I don’t sleep well at night and I walk through the house often. Now that I’m relying on the sensors, it’s sometimes too accurate in detecting my presence. But, that’ll get figured out through some new automations and lights I ordered to change interaction in the master. Tomorrow amazon will deliver some new led’s and I can begin honing those into a perfect overnight recipe.
blink/blink
:bulb:

Just an update. I set up LED’s under the bed again (the old ones died). This time, I wired them half and half. So If Jeff is in bed, only my side will light if I walk into the room and vise versa. I’m waiting on the other controller to be delivered on Wednesday to finish up and get rules set up for this. I’m looking forward to seeing this through. Since Jeff is in bed, I wasn’t able to get photos of the diffuser install to go along with things, but I’ll add them tomorrow.

image

6 Likes

So, an update on the sensors that I’m losing sleep over. (Pun intended).
So, after getting the mattress back in place, it seems that one sensor settled in at 2hundred something when there was no on in bed. Ok, I can handle that. NOW, the other side of the bed is significantly slower in response. This is not ok. Not to mention my lights are flashing on and off whenever I roll over. What the heck. Yah … no sleepy sleepy.

(meanwhile, April’s husband slumbers peacefully. Not bothered by the dim blue ambient light this creates regularly.)

Today, he helped me lift the mattress so that I could figure out what’s going on. It didn’t take me long. It turns out that since our bed is homemade, the boards on the underside were not quite level/flush. (platform bed).

I removed the tape I put down to protect the strips and proceeded to use up my double sided foam tape squares until I got some lift on the strips. After I replaced the mattress. (Which wasn’t easy. All 5’3" of me lugging around a King mattress would be quite the sight) But, I got it done. Now both strips are reporting 0 when there is no one in bed. Goal #1 accomplished.

It’s not beautiful, but no one will see it. In a couple of places, I used an extra foam square on top to adjust for any unlevel-ness this homemade bed would still possess.

I was going to use a couple of ultrasonic sensors to help with the light situation, but decided that a couple of aqara motion sensors would probably do the trick. I worried that my puppy would be bothered by the frequency, although I read that they wouldn’t be able to hear it, I didn’t want to put a bunch of work into it and find out that it was a big fat no. Markus is tinkering with those in his spare time. I’ll continue to move forward with the motions to achieve this goal. It’s not there yet, but it’s much better than it was yesterday. I’m excited to get this one right. In the future, I might do this for guest bedrooms to help with the lighting. Seems an easy solution when it’s working well.

5 Likes

IT’S WORKING! And I’m so pleased with it. Only took me a week!

So … motion triggers the lights to white in home mode. In quiet mode, Motion will only turn on the side of the bed that is NOT occupied.

In night mode, nothing will trigger.

Mode can only change if pressure is at 0 AND motion under the bed is active. It worked perfectly in testing. No flashing lights. Here is photos of the flows.

This is done in node red because I wanted you to be able to do this project. I’m in love with this automation. Markus has a slightly different use case, so I’ll be documenting his as he has time.

3 Likes

Hey @april.brandt

I’ve done something similar but using the HX711 load cells but despite working fine for a few hours, I’m regularly seeing very strange readings both high and low…still figuring out why they all of a sudden go a bit weird…

But more to the reason for my reply - which nodes are you using for MQTT in the above screenshots? and the blue nodes? I’ve started using Tasmota nodes more now as they provide greater functionality than the standard MQTT nodes. I’m loving the Node Red side of HA now as previously found HE Rules challenging to setup however I am missing the logging provided in HE.

2 Likes

Impressive project! I’m so lazy. I just use a couple of Withings sleep pads which nowadays work great on Hubitat. They used to time out all the time… I’m in Thailand behind the Great Silk Curtain, which often meant the response from my hub didn’t get back to the Withings server within the requisite 2 seconds. I think Withings made it less picky because it works almost flawlessly now. Much easier, but a bit pricey.

For motion sensing in the bedroom, I’ve put all my motion sensors at floor level. This has worked out great. It means the dim lights come on immediately a leg is dropped over the side of the bed, without having to wait for the Withings integration to check/respond (since it’s a Cloud integration it’s not instantaneous). But I can still use the sleep pads to turn lights off, arm/disarm the alarm, determine which lights to put on etc. Rules are in Node Red because I’m so sick of the continuous tinkering with Rule Machine, lack of backward compatibility which means the rules have to be entirely rewritten yet again if you want to take advantage of the new functionality, and endless bugs. It’s enough.

Very happy with my sleep pad setup now.

3 Likes

Everything has bee stable for a week now with the sensors. I did have to modify it yesterday to account for an uneven area in the bed. If you’re thinking of swapping, mine have been solid.

for zigbee i’m using
node-red-contrib-zigbee2mqtt
For Z-Wave I’m using the built-in mqtt node
The blue is magic home nodes.
node-red-contrib-magichome

Push stuff for our logging into grafana.

1 Like

Do you have modes per room or is this a global house mode? I have been wanting to implement a per room mode, but it seems like a ton of work to keep everything straight, especially if you are using NR context variables.

1 Like

My dev environment does things differently with the logic engine. But we’ve tried to keep the same mode concept as everyone is used to.

I use a global mode set. Realistically, there are only a few things that need to be responsive to certain modes. So doing a per room mode would be a lot of work. I use Home, Away, Quiet, and Night. Quiet and night are the most important for lighting and I use those modes to cover the bedrooms. So quiet for kids means that lights wouldn’t interact in those places, but you may receive a pushover notification or a change in light color if someone wanders out of their room because they “can’t sleep”.
For us, quiet means that the kitchen lights can’t go to full brightness and also means the unoccupied side of the bed will light on motion, but the bedroom lights will not come on in full brightness in respect to the sleeping other half. In home mode, everything interacts as there shouldn’t be anyone sleeping or resting. But, should one of us decide on an afternoon nappie, then quiet would be triggered just by being on the bed. It’s a nice feature.
Really, by doing it this way, you think - what do I want to happen if we’re away? What happens when quiet mode hits (someone sleeping). What do I want to happen with lights when we’re in bed in night mode. Then set your interactions accordingly. It’s really just a state. I have night mode trigger tv’s to turn off if they’re on through harmony.
Also, I do have to say that not everything reacts according to mode. Our basement lights and tv aren’t affected at all. If I do down there in the night, they will work the same no matter what time it is. Lighting is determined first, by motion, but mainly by harmony in the living room. If I’m in my office the lights in the living room will stay on as long as I’m in there, but if the tv is on per harmony, then the lights will not turn off until after the tv does and motion is quiet.
The easiest way for me to explain what I do for modes is something that I want to react in a certain way when the criteria fits of of the four modes all the time. Otherwise there’s not a need to attach it to mode. If the lights remain off when I’m not in a room, then the goal is met.

Here is my mode flow

Also, here is presence in node red

2 Likes

Very interesting, yeah the only reason I thought of doing per room modes is that I do not like changing global modes based on anything but presence (for away) and times for the rest as it does not lend itself to multiple groups populating the same house, i.e. a family dynamic. For instance, if the parents went to bed, you wouldn’t want the global mode to be night if the kids are still up and playing or working on homework. Time based mode changes seem to be the only way for global modes to work consistently in most situations. That honestly has been the toughest nut to crack with HA for me, making automations work for more than just a single repeatable schedule.

1 Like

I agree. Perhaps I can offer some insight on ways around that situation. I used qi chargers for my phones and fashioned smart qi chargers to accommodate that very same situation. Something natural that could happen when that situation arises for the room. then modes could still be in commonplace, but rooms would act accordingly. Like our kitchen lights blaze into our bedroom. That being said, when one of us is in bed, we still need lights to interact if one of us is up, but not at top level. Hence quiet mode. If you integrated a smart charger, a tasker rule or perhaps some type of pressure sensor or something specific to that room. Could do a round pressure sensor that the qi charger sits on for a trigger or the phone itself. Just a few solutions. I have a project listed here smart qi charger if you search it.

[Project] Homemade Smart Qi Charger - Automation Central / Automation Hardware - Oh-La LABS Community

I try to avoid time based rules because I really try to tell myself that I’m not a creature of habit, but we all know that you could very easily call BS on that one. I’m not good at sleeping through the night and get up at various times to walk around, so I try to be creative with these things so that I’m not waking the hubs every hour when I make my random rounds through the house.

I’d be happy to try to suggest some possible solutions if you share your use cases.

1 Like

I don’t really have any pains points right now outside of bedroom lighting, which I recently improved by getting contact sensors on the door which along with the motion sensors determine the occupancy of the room and turn it into manual or automatic “mode”. This could be improved further by a pressure sensor under the bed, but for now I just say goodnight to Alexa and it disables motion sensing for the room and contact sensing on the door, then the good morning command re-enables the contact sensor. And when the contact sensor opens, the motion sensor is enabled, thus turning the lights on if there is motion. Side-note, I probably could just re-enable both, but ambient light during the morning is plenty and this has the benefit of not blinding people immediately when they wake up.

The pressure sensors would take place of the alexa commands in the flow. Also instead of turning off motion sensing, I could also do a “quiet mode” where the lights are just dim as a sort of night light.

1 Like

Been messing with a doppler board lately too. You might be interested in that, maybe?

HiLetgo 5pcs RCWL-0516 RCWL 0516 Microwave Radar Sensor Human Sensor Body Sensor Module Induction Switch Module Output 3.3V: Amazon.com: Industrial & Scientific

Might be on the project list. I can think up all kinds of cool uses for it, but they are hard to point. From what I read, you can achieve this with a bit of tin foil. I’ve not tackled this yet, BUT I have one of these on my desk. I considered ultrasonic sensors, but I worry that my dog may be bothered by the frequency. It’s not quite to their hearing range, but close enough to wonder if she could hear it.
THIS could be the answer that you’re looking for. Hiding it in the right spot.

1 Like