We received a question about how to do this on the “old” smartly thread. I’ll post an answer there…to some extent, at some point, but the more complete answer and “How To” is here!
The Question
Short Answer - YES!
Longer Answer -
The first (and biggest) challenge is to figure out what/if your cameras URL and possible JSON are. I have a Reolink PTZ camera, so those are the settings I’ll be working with. The general premise of this integration would work for any camera, if it supports control via HTTP API. I contacted Reolink support and they sent me the documentation link.
If anyone has additional camera info please LMK and I can update this post.
Settings for Reolink PTZ Preset Control -
URL - (used as POST)
http://CAMERA_IP/cgi-bin/api.cgi?cmd=PtzCtrl&user=admin&password=YOURPASSWORD
JSON (edit “id”:X to change positions)
[{"cmd":"PtzCtrl","action":0,"param":{"channel":0,"op":"ToPos","speed":32,"id":1}}]
Programing -
Once you have the correct code we can automate those action via Node-Red. To do this I create a Virtual Switch for each camera position. I set the switch to automatically turn off after 1 second since “Off” is never needed.
The “rule” Node-Red style is basically, if Vswitch1 is turned on go to position 1, if Vswitch2 is turned on go to position 2…
Sequence for importing
[{"id":"404380f1.11fe","type":"http request","z":"102546f5.2a0b69","name":"","method":"POST","ret":"txt","paytoqs":"query","url":"http://CAMERA_IP/cgi-bin/api.cgi?cmd=PtzCtrl&user=admin&password=YOUPASSWORD","tls":"","persist":true,"proxy":"","authType":"","x":910,"y":1360,"wires":[[]]},{"id":"e6b5c781.f25cb8","type":"change","z":"102546f5.2a0b69","name":"Postion 1","rules":[{"t":"set","p":"payload","pt":"msg","to":"[{\"cmd\":\"PtzCtrl\",\"action\":0,\"param\":{\"channel\":0,\"op\":\"ToPos\",\"speed\":32,\"id\":1}}]","tot":"json"}],"action":"","property":"","from":"","to":"","reg":false,"x":740,"y":1320,"wires":[["404380f1.11fe"]]},{"id":"b122128a.0b741","type":"change","z":"102546f5.2a0b69","name":"Postion 2","rules":[{"t":"set","p":"payload","pt":"msg","to":"[{\"cmd\":\"PtzCtrl\",\"action\":0,\"param\":{\"channel\":0,\"op\":\"ToPos\",\"speed\":32,\"id\":2}}]","tot":"json"}],"action":"","property":"","from":"","to":"","reg":false,"x":740,"y":1360,"wires":[["404380f1.11fe"]]},{"id":"292087fb.83ee38","type":"change","z":"102546f5.2a0b69","name":"Postion 3","rules":[{"t":"set","p":"payload","pt":"msg","to":"[{\"cmd\":\"PtzCtrl\",\"action\":0,\"param\":{\"channel\":0,\"op\":\"ToPos\",\"speed\":32,\"id\":3}}]","tot":"json"}],"action":"","property":"","from":"","to":"","reg":false,"x":740,"y":1400,"wires":[["404380f1.11fe"]]},{"id":"a51a6cc0.4a7d6","type":"hubitat device","z":"102546f5.2a0b69","deviceLabel":"VD - ReoLink Position 1","name":"VD for Postion 1 ","server":"e03140c5.bed32","deviceId":"1544","attribute":"switch","sendEvent":true,"x":460,"y":1300,"wires":[["e0b3d50e.191588"]]},{"id":"e0b3d50e.191588","type":"switch","z":"102546f5.2a0b69","name":"On?","property":"payload.value","propertyType":"msg","rules":[{"t":"eq","v":"on","vt":"str"}],"checkall":"true","repair":false,"outputs":1,"x":610,"y":1320,"wires":[["e6b5c781.f25cb8"]]},{"id":"2a14fa87.fe6fb6","type":"hubitat device","z":"102546f5.2a0b69","deviceLabel":"VD - ReoLink Position 1","name":"VD for Postion 2 ","server":"e03140c5.bed32","deviceId":"1545","attribute":"switch","sendEvent":true,"x":460,"y":1360,"wires":[["4cc5293f.4efe18"]]},{"id":"4cc5293f.4efe18","type":"switch","z":"102546f5.2a0b69","name":"On?","property":"payload.value","propertyType":"msg","rules":[{"t":"eq","v":"on","vt":"str"}],"checkall":"true","repair":false,"outputs":1,"x":610,"y":1360,"wires":[["b122128a.0b741"]]},{"id":"27029684.7fe9ea","type":"hubitat device","z":"102546f5.2a0b69","deviceLabel":"VD - ReoLink Position 1","name":"VD for Postion 3 ","server":"e03140c5.bed32","deviceId":"1546","attribute":"switch","sendEvent":true,"x":460,"y":1420,"wires":[["3fc1daa8.cce016"]]},{"id":"3fc1daa8.cce016","type":"switch","z":"102546f5.2a0b69","name":"On?","property":"payload.value","propertyType":"msg","rules":[{"t":"eq","v":"on","vt":"str"}],"checkall":"true","repair":false,"outputs":1,"x":610,"y":1400,"wires":[["292087fb.83ee38"]]},{"id":"e03140c5.bed32","type":"hubitat config","name":"Apps Hub","usetls":false,"host":"10.13.9.12","port":"80","appId":"899","nodeRedServer":"http://10.13.9.28:1880","webhookPath":"/hubitat/webhook___","autoRefresh":true,"useWebsocket":false}]
smartly dashboard -
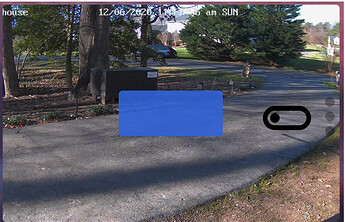
Using the smartly advanced grid with the stacking method, we can superimpose these tile over the image coming from the camera. The camera tile is a simple image tile set to refresh every second. With the virtual device tiles on top of the camera tile they can be turned “On” moving the camera to that preset position.
Following CCS will remove the tile title, increase the size of the icon so it’s easy to push, make everything invisible by setting the opacity to 0.
Note the last 0 can be changed to a 1 in order to see the icons or three dots…
color:rgba(0,0,0,1) !important; (see right most tile below)
#tile-72 .tile-title {
     display:none;
}
#tile-72 .material-icons {
     font-size:75px !important;
     color:rgba(0,0,0,0) !important;
}
#tile-72 .tile-edit {
     position:relative !important;
     top: -85px !important;
     right: -85px !important;
 }
To make the switches transparent when off use this code
(this will make all switches transparent when off, to do selectively add #tile-123 to the beginning)
.tile.switch.off {
  background: transparent !important;
}
The Results - (tiles in each state for example)
The ending result is a great way to use your PTZ presets via your HE smartly’d dashboard. Normally each “switch” is off and will not be visible (far left tile) on the dashboard. When triggered the switch turns blue (middle tile) to acknowledge the request. The switch then automatically goes back “off” after 1 second making it invisible again.
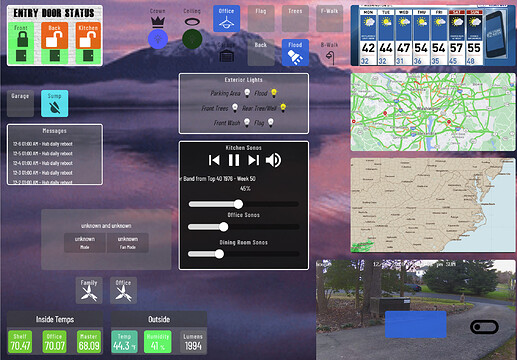
Don’t let the size of this picture fool you. This tile is part of a much broader dashboard. Each tile is about as small as my fat finger can isolate. ![]()


