I think I’ll need you to extract the html of that tile and PM it to me. Strange, the title replacement at the top should be working… unknown about the bottom text, but it is something we can handle with some simple CSS.
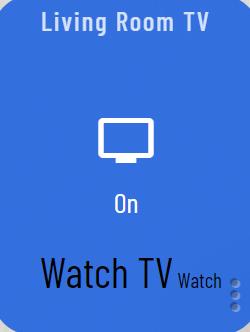
Thanks for the update. When I add a string in (or an integer) in this Mod, all it does is add that string *“Watch”) to the tile. In custom css, I don’t see a new class for “attribute-Watch”. Below is what I see.
{\"id\":44,\"template\":\"attribute\",\"templateExtra\":\"Activity\",\"pos\":37,\"mods\":{\"unit\":{\"value\":\"Watch\"},\"numeric\":{\"value\":\"unchecked\"},\"title\":{\"value\":null},\"text_alignment\":{\"value\":null},\"remove_title\":{\"value\":true},\"nudge\":{\"value\":\"unchecked\"},\"icon\":{\"value\":null},\"zoomable\":{\"value\":null},\"color_fg\":{\"value\":\"rgba(1, 1, 1, 1.0)\"},\"color_bg\":{\"value\":\"rgba(255, 255, 255, 0.0)\"},\"border\":{\"value\":\"rgba(255, 255, 255, 0.0)\",\"modifier\":{\"border_size\":{\"value\":null}}}},\"states\":{\"default\":{\"code\":null,\"class\":\"\"}}}},\"settings\":{\"commit\":\"9621aa326d944b39fea8ea373ba73507a6c7d388\",\"calibration\":{\"source\":\"\\/var\\/www\\/html\\/smartly\\/assets\\/data\\/device_cals.json\",\"colwidth\":60,\"gridgap\":15,\"colcount\":16},\"iconSize\":\"30\",\"fontSize\":\"14\"},\"dashboard\":{\"mods\":{\"cal_devices\":[\"amazon_kindle-fire-hd10\"],\"cal_devices_2col\":null,\"header\":{\"value\":\"stealth_top_right\"},\"hide_scrollbars\":{\"value\":null},\"parallax\":{\"value\":null},\"chroma_battery\":{\"value\":null},\"chroma_temperature\":{\"value\":\"chroma_temperature\"},\"chroma_humidity\":{\"value\":\"chroma_humidity\"}}}}"
    },
1 Like
It looks like you typed “Watch” into the “unit” mod for the attribute tile. You can remove the text you typed in there. That mod just takes whatever you type in and places it after the content… so you’d use it to put a “watts” after an electric value. That’s why you’re seeing “Watch” in small text after the content.
Okay so you want the text of that attribute tile to change color depending on what the content is… in your case “Watch” or “Power Off”.
The new ‘attribute-[value]’ class isn’t something you see unless you are familiar with html/css and the inspector tool. It’s there, but isn’t taken advantage of until you add some CSS to your CUSTOM CSS to use it.
To have the text of that tile turn white when it says Watch, you’d want to add something like this to the very bottom of your dashboard CSS.
[Settings (gear) > CSS > scroll to bottom.]
/* ------- CUSTOM CSS BELOW THIS LINE - This CSS will be preserved during updates ------- */

#tile-44.attribute-Watch {
  color: white !important;
}
Assuming that attribute tile ID is 44.
Thanks for the response and my bad on the units mod.
I had typed the below code in and it didn’t work though. Just added !important and still didn’t work.
#tile-44.attribute-Watch {
color: white;
}
Oh, Happy Thanksgiving also! Thanks for this great app and for all your help!
1 Like
Is the id 44 of the attribute tile, and have you updated smartly inject with HPM?
Yes to both
1 Like
I’ll be around today, between naps and eating![]() if you get a chance let’s have you [smartly] how to extract tile html send me the HTML of that tile, and also [smartly] how to send your JSON for troubleshooting PM me your json
if you get a chance let’s have you [smartly] how to extract tile html send me the HTML of that tile, and also [smartly] how to send your JSON for troubleshooting PM me your json ![]()
happy ![]() day!
day!
Ah, I now see what the issue is and have fixed it…
I had changed the color of the tile to black (because it’s stacked and needs to be white when the TV is off). I then want the color to be white when it starts with “Watch”. I think because .tile-primary is deeper in, it always takes precedence over tile-44.attribute-Watch regardless of the use of !important.
I fixed it by removing the color from .tile-primary and putting it on tile-44 itself.
#tile-44.attribute-Watch {
color: white !important;
}
#tile-44 {
color: black;
}
Works great now. Thanks
1 Like
That makes sense. You were using text color mod, so it was overriding it. Happy to hear it’s working! 
Hello. When I go to the Smartly site I can only choose the default background. Is there a way to add the other background? Thanks.
Though there are a handful of other “skins” you can choose in smartly that each have a unique background, the only way to customize that is to change your background in the HE dashboard itself.
Note: currently we don’t have a version of smartly that doesn’t reset some of the dashboard options, so for the time being you’ll have to change your background after updating.
I’ve had my hubitat for a week so forgive me if this question is obvious but I’m just not getting it. I’m interested in the battery - custom thresholds. Where is the screen that I can set these options? I can’t find anything that looks like the screenshots in the post.
1 Like
No worries! After pasting your JSON and clicking ‘update’ in smartly, it will show a preview grid of your dashboard. Click on the gear to the top-right of that grid to see dashboard settings. Under the color tab you’ll see the global color settings for battery tiles. If you instead just clicked on one of the battery tiles in the preview grid, you’ll get those same options in that same tab, but per tile.
Ah-ha. The one place I didn’t think to look! Thank you!
1 Like
I don’t know if this is a solution or a work around dealing with string variable titles etc.
Use a simple device with a string attribute. Right now I am using Virtual Omni Sensor because it has a string attribute called variable. I can populate the variable and use it in Smartly just like any other attribute. And it comes with all the editing abilities that already exist for attributes. Just a thought.
2 Likes
I am trying out Smartly v2 for the first time (I had used the v1). I created a new dashboard (Latest version of hub) to test with, added devices, got everything set up in smartly, copied it into the css for the dashboard, saved it. No errors for anything, but my dashboard looks exactly the same! I’ve tried reloading the page, off and on etc, but it all seems to be the basic hubitat colors and no update at all. Any ideas why?
2 Likes
Couple things. Make sure you click the “Copy to Clipboard” button, it’s a second click and in re-doing my dashes to v2 I have also often miss that second click (we are discussing option to fix it).
Secondly if that is not it, try a incognito/private window. Some extension are known to mess with smartly. LMK what you find and we’ll go from there.
and Welcome to the OLL community!
1 Like
wait I just re-read this part. The stuff into and out of smartly is the JSON “Layout” tab, not CSS. Make sure you are deleting your “Layout” tab and pasting the smartly JSON in there.
1 Like
@TechMedX, thank you! That’s what I was missing. I swear with v1 it was into the CSS tab (I used the Layout to get into smartly, just put it in the css coming out). One of those days I guess! 
2 Likes