Dashboard Tiles Temperature

Is there a working method to have tiles show temperature with colours (from my motion controllers) and update them as they change?
I have been going around and around on threads here and Hubitat but can make no sense on how to do this (or if it is even possible yet).
I use celsius and that made it even more confusing.
I have smartly installed.
Are there some simple instructions anywhere?

Edit:
I think I have it working now.
But I need to find a way to fine tune the colour gradients.
All are between 18 C and 22 C and look to be the same green colour.

I posted important parts of my OP below for your review. However your not going to get much of a difference with those ranges. It’s meant for tracking outside temp over summer/winter.

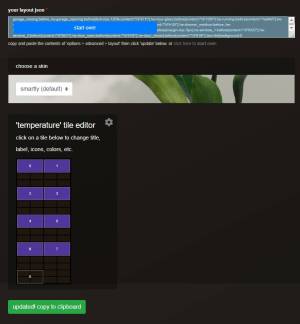
To customize the temp colors you have two choices

1 - With smartly 2.1 you can target the temps using this code (goes in the CSS section)

.temp-73 {background-color: rgba(89,220,0,0.99)!important;}

This will work for every temp tile, but only change every whole digit (no decimals).

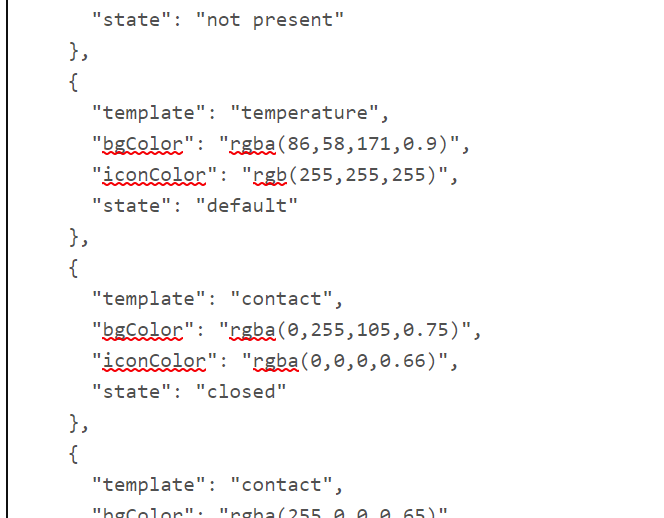
2 - This is my OG code. (this code goes in the JSON)

  {
      "template": "temperature",
      "bgColor": "rgba(89,220,0,0.99)",
      "iconColor": "rgba(255,255,255,0.99)",
      "state": "18.0"
    },
    {
      "template": "temperature",
      "bgColor": "rgba(89,220,0,0.99)",
      "iconColor": "rgba(255,255,255,0.99)",
      "state": "18.1"
    },

This code breaks it out every tenth of a degree for much finer color change tracking.

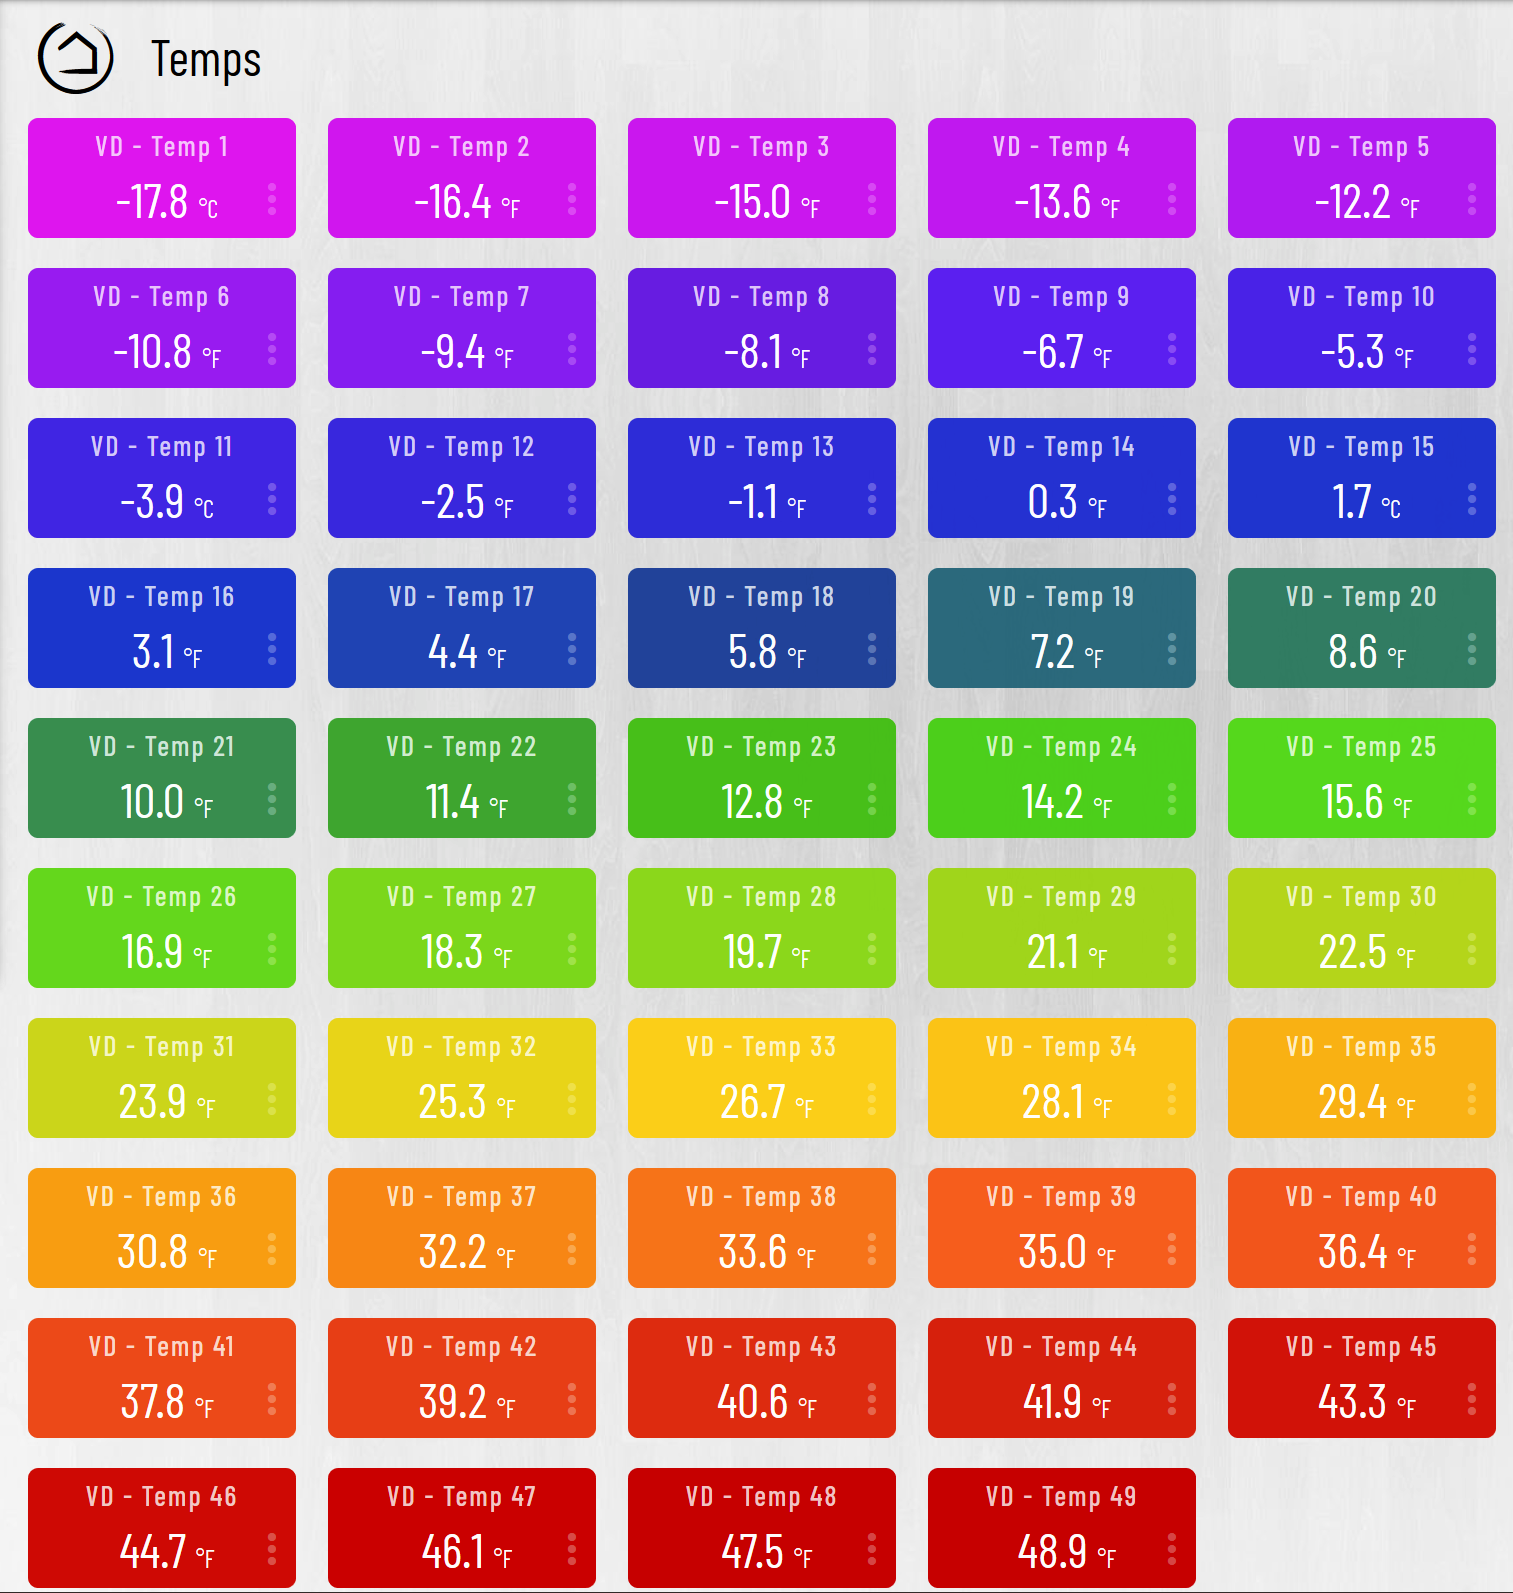
If you plan to use my JSON code DO NOT select the color temp options in smartly. That would likely create a conflict. If you do plan to use my OG code, and would like it all, please let me know. I have everything from -17.8 - 48.9 but they are the colors you see at the link above. Which you can change by editing the rgba numbers.

Also if you use my OG code you need to use something (like in averaging app) to give you 1 decimal, not 2. The code will not work with 2 decimal places. If you use the entire code it will break cloud dashes (over the limit), but it you only use that section you’ll be fine.

Temperature

Celsius temperature chart

Fahrenheit temperature color chart

Sensor Reading Note - the coding for this is lengthy, and could only be done out to the tenth of a degree. If your sensors read to the hundredth it will need to be adjusted to work with this mod (see below). We recommend using @Cobra’s Average All. This app will allow you to easily create a virtual sensor using only 1 decimal.

Far left sensor reading not supported.

Thanks for that. Makes more sense to me now. I am waiting for two sensors for the garage and outside security light, which should be here this afternoon.
The indoor motion sensors I have atm (all ST ones) do go to 2 decimal places. Not sure about the ones coming today (SONOFF SNZB-03).
I will try the CSS method first, as I really only require 1 degree accuracy and intend to try and keep it as simple as possible. But in saying that, I am new to Hubitat and everything I have done so far I have wanted to expand on. Seems adddictive like that :slight_smile:
Thanks again.

1 Like

Almost forgot you might want this as well. It makes all the text white. I think it looks better on some (most) colors, but that’s just me.

.tile.temperature, 
.tile.temperature .tile-primary, 
.tile.temperature .tile-edit i {
    color: white !important;
}

Thanks for that. Is there any way I can use smartly without it changing my layout? I just want the 4 rows and 2 coulmns I had with the added coloured temperature tiles and no background image.

Edit: Figured it out :slight_smile:

1 Like

All looking good now except for one thing I cannot figure out.
I am guessing it is more CSS?
Before I use Smartly there is some padding on the right-hand side, same as one the left-side. Now the right-side tiles are up against the screen edge.
Would be great if I can get this back. Similar on the bottom would be good too but not so important.
Anyway to do this? If not, no problem. I can live with it. Its just great to have the this working as it is :slight_smile:

layout

It looks like you need calibration. Click the gear icon on the top right corner of the dashboard tile editor.

Then click over to the calibration tab. Enter all the devices you want calibrated. If you want 2 columns, which it looks like you do, be sure to use the second field as shown below.

If it is still off a bit LMK and we can tweak it more.

Thanks. I tried this and it looks good until the dashboard is refreshed and then it goes to the edge again.
I think I will just keep it as it is. Every time I use the editor it adds loads of columns and rows (not sure why it needs to do this) and I then have to spend a while going through it to get it back to 2X4.

I even used the layout from one that had previously been throught the tile editor (maybe a couple of times) and this made 64 rows. I seemed to double up the rows and cloumns each time I used it.

Is this how it is supposed to work?

Anyway I am happy how it is, so thanks :slight_smile:

No this not how it should act. On the options screen what is your Column Width and Row Height?

It almost sounds like smartly is converting you to advanced grid settings with every pass.

tagging @spelcheck to get his take on that.

1 Like

I think it was me. I was copying the Layout to the ‘your layout json’ field after it had already been edited (usually because i forgot to change an icon etc). I should have just used the existing layout json rather than ‘start over’.
When I create a dashboard I do not automaticaly add any tiles (click manually add tiles).
Then I close the ‘Add Tile’ window and go into grid options and and set it to 2 Columns by 4 Rows.
The delete the column width and column height entries.
Then when I add my tiles, one by one, it atuomatically puts them where I want them.

Then I copy the Layout and paste it into the ‘your layout json’ field.

image02

Make some changes in the dashboard, realise i missed something and then paste it back into the ‘your layout json’ field . So ecah time it is spanning over more rows and cloumns.

image03

What I need to do i think is go into the layout editor and remove the column and row span (so they only span over 1) if I use the ‘your layout json’ field again.

Still though, I am unsure why it needs to automatically span over more rows/columns than I had set in the dashboard editor. I am sure there is a good reason but took me ages to figure out how to edit it to remove the spans. Is there an option anywhere where it will keep it spanned to 1 column/row, or as it was in the dashboard editor?

Edit: Also I have it looking more centrally aligned now. My device was not on default dpi.

1 Like

Just getting caught up! SMARTLY uses specific grid settings (row height and column width) to allow for adjusting the height and width of each tile independently. This gives us the ability to make the best use of space, and we’ve made it easy to adjust with SMARTLY INJECT drag-and-drop mode. This is done by default, and more information on why we do it here.

The calibration feature should accommodate for this, so no changes to the span are needed.

This is happening because SMARTLY is seeing those column/row settings and re-converting it every time, adjusting the grid and spanning your tiles to adjust for it. After your JSON is updated, just leave the grid settings alone :slight_smile:

Edit: looking like you got it working now with the stock device dpi?

1 Like

Thanks, that all makes sense to me.
Yes was working with default dpi… but the mrs saw me playing with it and now wants smaller tiles with the pic of the plant on the dashboard. I guess it makes things easier and will let me use smartly to its full with some custom sized tiles. So all is good.
Thanks for developing this. Might just become my favourite addon feature of HE :slight_smile:

2 Likes

That’s great news, very happy to hear! :grin:

1 Like

sorry. Noob question: I tried to write that down after **/\r\n\r\n/ ------- CUSTOM CSS BELOW THIS LINE - This CSS will be preserved during updates ------- */\r\n\r\n\r\n\r\n"

but it says **Unexpected token { in JSON at position 46877

can you help me, please? thank you

1 Like

This code goes in the top of the JSON not down there. Scroll down thru your JSON and find this section (start at the top it’s not very far down)

Insert that code in place of the ‘default’ code section. Be sure all the

},
{

are correct and you do not mess up the “flow” If you need help you can pastebin.com me your JSON and I can put it in there for you (some).