Treatlife Fan+Light Controller DS03 Tasmota for HE Support

I have a big spiel about my quest to get this switch integrated into my HE (which I posted in depth here) [side note, if it’s bad juju to link to another community, I’ll remove that link; I mean no disrespect!], which sent me off on a rabbit trail of looking into Home Assistant for MQTT support, and perusing here (where I learned that there is a “new hub” in development, I think? I need to read more, but it seems like it’ll be something similar to HE but with Wifi device support as well? I’m thoroughly intrigued, but I digress…).

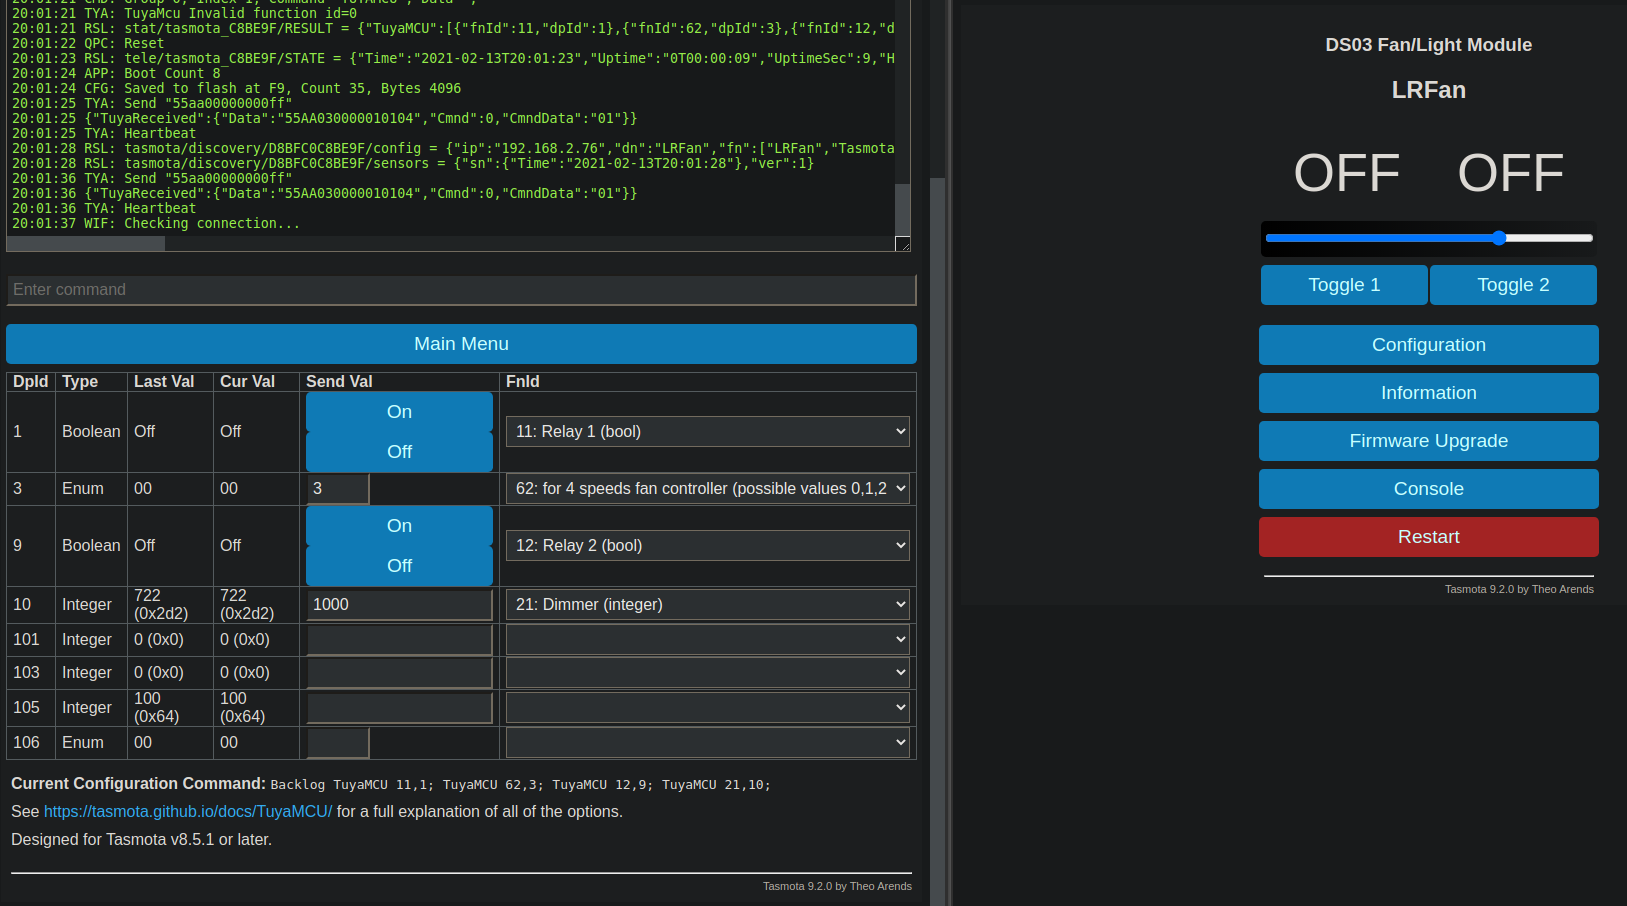
Here’s the point. These switches use the TuyaMCU stuff that Tasmota seems to work with, kinda sort of, for the most part. I’ve managed to get my treatlife single-pole, 3-ways, dimmers, all up and running, but this damn fan controller is driving me insane. @markus’s driver and app are beyond phenomenal in this entire endeavor, but it seems there’s a slight hiccup with how Tasmota interacts with the TuyaMCU for “enum DpIDs,” evident in the fact that even when using the DS03 template, the GUI can’t change the fan speeds, as described here. The template setup uses the TuyaMCU serial commands to then publish MQTT posts on the fan speed status.

One of the latest updates to Tasmota, version 9.2, states that they’ve added support for TuyaMCU enum stuff (found here). Would it be overly difficult to “cut and paste” the HE integration from the 8.5 version of Tasmota I’m using now into the 9.2 version that supports the enum stuff? Or would markus’s T4HE work with the “stock” Tasmota 9.2?

Of course, this assumes Tasmota 9.2 actually operates the switch properly in the first place. I’m at work and can’t flash and test this stuff at the moment (this will be today’s after-work-project). Looking at the logs in the console on the 8.5 version, it seems the “0-3” buttons that are on the GUI for fan control (after mapping them via the TuyaMCU 3,61 command) send the command “Group 0, Index 2, Command “TUYASEND”, DATA 3,#”, the # being whatever speed you selected from 0-3. This doesn’t do anything because Tasmota uses TuyaSend4 to operate the enum stuff. If you use TuyaSend4 3,# in the console, the switch responds as it should.

So, circling back to the beginning, kind of, if T4HE essentially uses commands like the GUI would, then adding the fan to HE via the fan control child driver wouldn’t fully accomplish the goal because swapping speeds would just send “TuyaSend” commands, which would get ignored. Again, I’m not sure if this is corrected in Tasmota 9.2, and if it is, then integrating the HE elements into that version of Tasmota (essentially upgrading the "Tasmota with HttpHook by Oh-La Labs to the 9.2 version would alleviate this) would fix all of this.

… I think. I’m a “power-tinkerer” at best and a complete novice at all-things coding, so maybe I’m just talking out of my ass. And, as always, this gets horrendously long-winded so I’ll end it here. If anybody has any advice, tips, input, thoughts, or anything of the like, it would be greatly appreciated. :slight_smile:

Welcome to the community Logan. Great to see you here. No issues cross posting. I think that @jchurch would be very interested in your thread. He’s our “power tinkerer” here and LOVES new integrations. It’s a bit late in Brisbane, but he’ll see my tag later on. Great write-up!

1 Like

Hi @logan @markus drivers are a modified Tasmota firmware called Tasmota by Theo Arends & with HttpHook by Oh-La Labs which runs on version 8.5.1, as such you should not use on a newer version of Tasmota native firmware with his Hubitat drivers as it can lead to all sorts of weirdness/problems.

Given you are still testing though and have identified a potential fix in a newer release I suggest upgrading you device to the latest Tasmota (without using the Hubitat driver) just to see if your issues are resolved. You can then test all the commands directly within the Tasmota console on the device to see if in fact it’s resolved. Once you have identified it’s working report that information back to us.

Thanks for the warm welcome! Got 9.2 loaded and configured using the instructions on the template page, while including TuyaMCU 62,3 which 3 is the DpID for the enum fan speed, and 62 is for the 4-speeds (although I’ve heard speed 0 and 1 output the same voltage so both are low, but I figured the switch has 4 lights so let’s stick with the 4 speeds for now). Per the screenshot, 9.2 won’t even show the FanSpeed or the 4 buttons to control it, so that kinda blows up that theory.

From the console the switch still responds to sending TuyaSend4 3,# commands, just as markus’s 8.5 did, so I’ll likely just go back to that since 9.2 doesn’t seem to have what I would need to make it worth updating to that, and adding an unnecessary variable into solving this.

I think my next step might be to see if I can use the T4HE fan child driver to “operate the switch,” but considering the FanSpeed on 8.5.1 is always 0 (even when I operate the switch with the TuyaSend4 command), so I’m not sure if that will help either.

Thoughts or suggestions for potential next steps?

The attached screenshot only works if I attach the screenshot.

Gotta love replying to myself.
This issue was also mentioned in the Tasmota github (here) back in November, where they said they were pulling the GUI buttons and (possibly) replacing it with a slider (guess that didn’t happen), so that might explain the missing gui options in the above screenshot.

Reading up on the enum changes and will reply to myself again if I figure anything out.

Ok… basically back to square one. Sadly, the enum commands being implemented (but then the GUI being removed) doesn’t seem to help me virtually at all. So I’m back to the 8.5.1 firmware.

I have the parent device set up to “reverse” the power commands since the “dimmer light” child power buttons are turning the fan on and off, but the dimmer setting is responding appropriately. I installed the fan controller child driver, set up the “second child” made by the parent as a fan controller. That gives me the fan control options in the device page. I send the “low” command and it turns on POWER2 (the light) and sends “Dimmer 1” command. So the “fan” is literally controlling the light and dimmer in the range of 0,1,2,3…

Reading up on rules some more to see if I can get a command from the fan controller to “re-operate” locally at the switch via tasmota. Such as when the switch gets the POWER2 ON and DIMMER 1 “payload” it would redirect it to POWER1 and DIMMER 1 sends “TuyaSend4 3,1”.

And that doesn’t even get into the “voice assistants” not wanting to play ball. I did read that the google home integration that “comes with” HE is garbage and that the community-built one can integrate a fan controller much better (or at all), so that solves that issue. Alexa might respond to an actual device rather than a virtual one operating via HTTP commands, so I’m hoping that falls into place too as soon as I can figure out how to get this to work at all.

Sadly though, working 3rd shift for 12-hours each day, My time at home to play with this stuff while I’m on shift is limited to a whopping 3-4 hour window (and that’s if I neglect the wife and kids for that window :sweat_smile:).

Just had another thought… Even if I can figure out a way to intercept the incoming commands from HE and change what gets operated via rules in Tasmota, that won’t “phone home” back to HE since it would be expecting a response from what it sent the change… right?
Hmmmmm…

@logan I have asked @markus to look into this one for you. Personally I would just do it all in Nodered MQTT to Tasmota then map the commands I wanted back to a virtual fan controller in Hubitat using makerapi as to remove any restrictions within Hubitat / drivers. Anyways he might have a fix / recommendation for you without doing it that way.

I haven’t taken the time to mess with MQTT or Nodered, but I’ve seen those terms associated with home assistant quite a bit, which is what had me looking into that and whether jumping ship from HE to HA was an option. The overall gist I’m getting is that HA is like the linux of home automation, thoroughly powerful, but you need to be a power house to really house it. I use linux as my daily OS, but I don’t code virtually at all, so the extent of my “linux knowledge” is googling solutions and implementing what I find, so setting up something like HA is doable, but not something I’m looking to invest the time in right now.

Beyond that, I’ve read something about MQTT brokers and how HE is not one of those? I don’t know enough about it to speak intelligently, but I’ll certainly look into it. If it’s something I can use to make my system more reliable and/or efficient, I’m certainly willing to look into it.

Thanks for your help thus far!

Watching videos about nodered! Unbelievable how powerful this seems, while still being user friendly with an efficient gui. I have a PC on the way that I intend to use as my always-on, always-connected system for blue iris camera software, I’ll deploy nodered on that and really dive into it! Definitely seems like this will be a better way to handle a lot of my “if this, then that/these” scenarios, vs HE rule manager. And with it being able to manage so many parts of payloads and messages individually, I can see how your suggestion of Nodered handling everything and sending the “end result” to HE would be a great way to handle this.

Thanks for the suggestion! :slight_smile:

2 Likes

@logan if you could make a forum post about what ends up working for you to get the TreatLife Light + Fan dimmer working that would be awesome. They are next on my to-do list. I am currently trying to get the TreatLife DS02S to work properly with HE.

The DS02S… is that the dimmer with the toggle button and the + - buttons on top? Or is that the one with the touch control vertically on the paddle? If it’s the latter, I have 3 of them installed and working, I can share my config.

@Rob Did my own googling and see that it is the same ones I have. Have you flashed Tasmota already (or plan to)? If not, I’m not sure I can help. I didn’t even power these on with the stock Tuya software (none of my IoT things are going to be phoning home to China), I went straight to Tasmota, so I’m not sure how (or if) you can tie them into HE with the stock software.
But, if you have Tasmota on them, I’d be happy to share my config stuff for it.

@logan I finally figured out how to get the DS02S working in Hubitat. I found a bug. Turns out you need to toggle the “Enable debug logging” for the switch to begin reporting changes made at the switch to Hubitat. This bug occurs in both v8.3.1 and v8.5.1.

For the DS02S I followed the instructions found on blakadder and they worked great.

Let me know if your configuration is different in any way.

Now I am moving on to the DS03. :+1:

To clarify, you only need to cycle “Enable debug logging” within the Parent Device. You do not need to keep it enabled for the switch to work.

That’s interesting that you had to do that. I don’t recall messing with those settings at all and haven’t had an issue with it. I do have info logging enabled, but I don’t think I’ve ever turned on debug logging. But hey, whatever works works!

Good luck with the DS03, that’s been the bane of my existence ever since plugging it in. I’ve given up messing with it until I get my Blue Iris PC set up, where I’ll also set up Nodered and just run everything through that. Unless you figure something out! Keep us posted!

2 Likes

How I got Treatlife DS03 Fan+Light+Dimmer Controller Working with HE

Prerequisites:

  1. Hubitat with Maker API set up to send commands to MQTT broker
  2. Always-On device to run MQTT and Nodered (I’ve heard a raspberry pi is a great, low-power solution, but I set mine up on a Windows PC that’s always-on anyway to run Blue Iris security cam software)
  3. Switch is flashed and running Tasmota
  4. Switch has been added to HE with Tasmota Device Manager and set up with light device as Generic Dimmer Switch, the other device will be added but ignored entirely (more details below)

I was in the process of writing up a description on how to do this when I realized I may be a minority that actually cares about having this work with HE or needs a “thorough writeup” of how to make it work, so I’ll just leave a stake in the ground saying I got it working reliably via a virtual switch in HE and Nodered handling virtually everything else. I made a flow that separates the light and fan commands (turning off the light was also turning off the fan), virtual switch in HE is updated when the switch is controlled locally, Alexa and Google can operate it (although it has to be controlled with “Set fan to off” vs “Turn off the fan”), etc.

Couple of notes. I do have the switch in Hubitat using the Tasmota Device Manager, and the “send power commands reversed” option is enabled in the device parent. This allows the light and dimmer to be controlled within HE, which doesn’t seem to have an issue with it, as long as the power commands are reversed (this option is in the “hidden options” that you also have to enable in the device parent menu. The fan “child device” gets created as well, but you can just ignore it entire as far as HE is concerned. DO NOT USE THIS DEVICE TO CONTROL THE FAN, MAKE A VIRTUAL FAN CONTROLLER AND ADD THAT TO MAKER API ACCESS Regarding the flow, the trigger stops “quick changes” at the local switch from creating a loop. My kids freaked out when their fan wouldn’t stop switching from medium to high and back again. :stuck_out_tongue_closed_eyes: The switch after the incoming MQTT with the empty output is “throwing out” the “TuyaSend:Done” message. The other two are power1 on and power1 off, which makes sure the fan power commands don’t get thrown out in favor of the subsequently received “off,” which also arrives if you turn off the light (which is why the fan would turn off if the light was turned off locally). Everything else goes through the trigger to ensure “quick switch” doesn’t make a loop.

So, if you have questions or want specifics, please ask and I’ll be more than happy to oblige any information you may need to get yours running too.

4 Likes

Some further updates to this, should the “google machine” bring people here:

I’ve tweaked the flow significantly to make a sub-flow for the actual operation steps, so the MQTT incoming messages go into the sub-flow, and a single command is output that contains a variable “topic” to direct the incoming command to the appropriate switch. Likewise for the reverse, where the command comes in from HE and goes out via a single MQTT out node. This allows for relatively quick copying to each of the devices with minimal manual adjustments.

I’ve also removed the dimmer operation from HE and the Tasmota Device Manager app, allowing me to pull that off of HE entirely. The device is essentially controlled entirely from Nodered and HE only uses a virtual dimmer and a virtual fan controller, which simplifies sending those devices out to voice assistants, rule machine, etc. I can put up a screenshot of the flow for the dimmers as well if anybody is interested in the future.

I’ve also learned that the tasmota command “TuyaSend9” will publish an MQTT message with the specific “TuyaSend” commands that were executed, along with the dpID and value that was sent, which makes a HUGE difference in keeping the device and HE “in sync.” I managed to accidentally enable this for one of my DS02S dimmers and spent upwards of 1.5 hours trying to figure out what SetOption command did it. Turns out it wasn’t SetOption at all and TuyaSend9 is only briefly mentioned, so it took me forever to realize this is what I did and was able to replicate it on all switches (all of my DS02S and DS03 fans). Before this, changing the dimmer at the switch would not update the status in HE. Since writing a flow that would receive these status change messages and send them off to HE, everything stays in sync with each other. Changing the switch locally updates the dashboard as well now. This presented hurdles with “loops” where the lights would go on and off or back and forth between dimmer states because HE would receive a value from the switch, change it on HE, which then sent the new status to Nodered, which then changed it at the switch via MQTT, which then sends the new (which was old) status back to the device, rinse and repeat. Putting in some triggers to catch the barrage of messages and RBE nodes to only output significant enough changes (like an actual change, as opposed to the slight 1-5 variance in rounding errors) put an end to the “bouncing.”

Again, if anybody finds this and needs more specific help, I’d be more than happy to go into further detail.